
Easiest Ways to Create an Email Distribution List
Have you ever asked yourself, “What did we do before email?”
Email has transformed how we communicate. Research shows that the average person receives 200 emails per day and spends over two hours sending and replying to messages. Fortunately, there are a few tricks to spend less time in your inbox — starting with creating an email distribution list.
An email distribution list is a group of contacts who you message on a recurring basis. Rather than emailing people one by one (or copying and pasting dozens of emails into a BCC field), you can simply fire off a message to one list, putting time back into your day.
Below, we explain what an email distribution list is, why it’s useful, and two ways to implement an email distribution list into your daily work hacks.
What Is an Email Distribution List, Anyway?
An email distribution list is a group of contacts addressed to a single recipient. A number of email providers (like Microsoft Outlook, GoDaddy email, and Gmail) allow you to create distribution lists so you can email a group of people without having to type out each individual address.
Email distribution lists are beneficial for a number of reasons, including:
- Saving time: With a distribution group, you can address your message to a single contact rather than typing out every individual address.
- Preventing duplicate work: Do you have a group of people you email regularly (such as clients, employees, or contractors)? If so, you’re probably tired of typing out individual addresses week after week. A distribution list can eliminate these redundancies.
- Allowing you to easily reach various departments: Need to schedule a meeting with or send announcements to various departments in your company? Create a distribution list to streamline internal communication at your company.
- Minimizing human error: When you BCC a group of people, you might leave a contact off of an important message. With a distribution list, you ensure that everyone receives your email.
- Convenience: An email distribution list is incredibly convenient. Rather than searching through your contact list, double-checking each address, and remembering every person you’re supposed to message, you can simply repurpose your distribution list week after week.
Create an Email Distribution List: A Quick Tutorial of Popular Platforms
Ready to build your first email distribution list? How you create your distribution group will depend on which email provider you use. Here are quick tutorials for a few popular platforms.
Create an Email Distribution List in Outlook
In Microsoft Outlook, email distribution lists are referred to as “contact groups.” To create your first contact group, you’ll:
- Click the people icon in your top navigation (depending on your web browser, the word “People” may be fully displayed).
- Under “My Contacts,” click “Contacts” or select another folder in which you’d like to store your group.
- Select “New Contact Group” and give your distribution list a unique and helpful name.
- Click the “Add Members” button to add people to your distribution list (your address book should automatically appear, allowing you to easily select recipients from Outlook contacts).
- Save and close your list.
- When you’re ready to email your contact group, create a new message in Outlook. In the “To” field, type your distribution list’s name.
- Type the remaining body of your email and send.
Create an Email Distribution List Using GoDaddy
To start using email distribution lists in GoDaddy, you’ll need to sign into your email and office dashboard. From there, complete the following steps:
- Select “Admin” from the top navigation. From the dropdown menu, select “Distribution Groups.”
- Click “Add Distribution Group,” then give your list a unique name and email address (e.g., marketing@yourcompanyname.com or clients@yourcompanyname.com). Note: If your list contains email contacts outside of your organization, you will need to ensure “Outside Users” is toggled on.
- To add new members to your group, check the box next to a user’s name. Once your list is complete, save.
- When you’re ready to email your list, type the group address into the “To” field of your message.
Create an Email Distribution List in Gmail
There are two ways to construct an email distribution list using Gmail. Below, we show you the older way, then walk you through a simplified method.
- Open Gmail. On the top right corner of your screen, click the Google apps icon (a square consisting of nine dots). Click “Groups” from the list of apps.
- On the left side panel, click “Create a group.”
- Give your group a name, an email address, and a short description. Click “Next.”
- On the next screen, determine who can view conversations, post to the group, or view group members.
- On the “Add members” screen, begin typing email addresses into the “Group members” field. Email recipients from your global address list will pop up when you start typing a recipient.
- Click “Create group.” Gmail will automatically email you that you’ve created a group. To message your group, type the group name or email address directly into the “To” field of a new email.
Create Your List Using Gumbamail
Want to know the easiest way to create an email distribution list? By combining Gmail and Gumbamail, you can create a distribution list in two minutes or less:
- Download the Gumbamail plugin from the Chrome web store. Please note: You need to have a Gmail account to start using Gumbamail.
- Follow the permissions prompts to give Gumbamail access to your Gmail account and list of contacts.
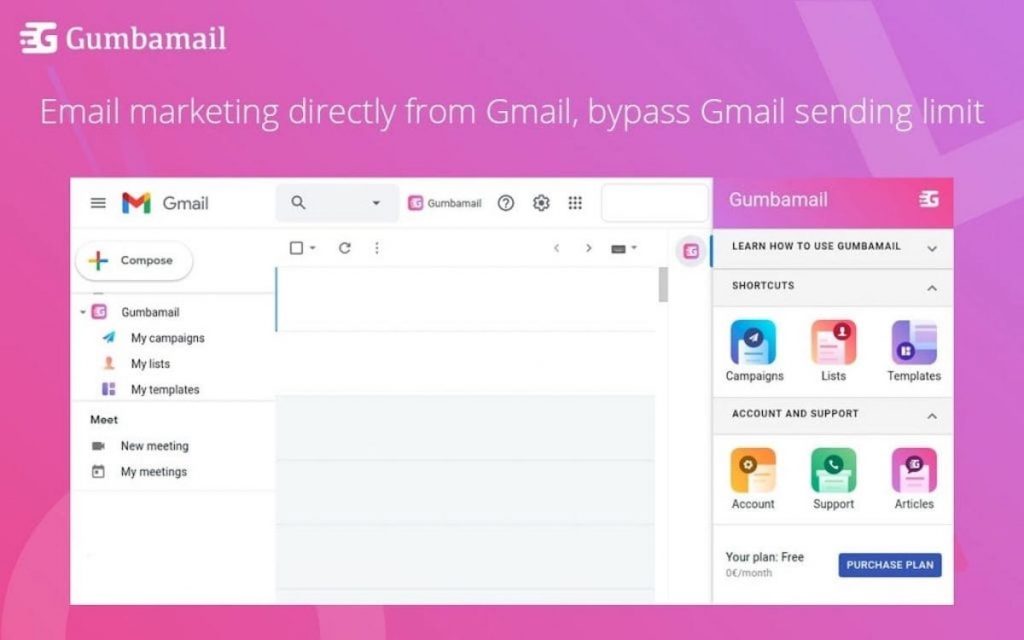
- Once logged into the Gmail dashboard, click the Gumbamail icon near the top-right corner of your browser. A right side panel will appear. Click “Lists.”
- Click the blue button titled “New List.” Give your list a name.
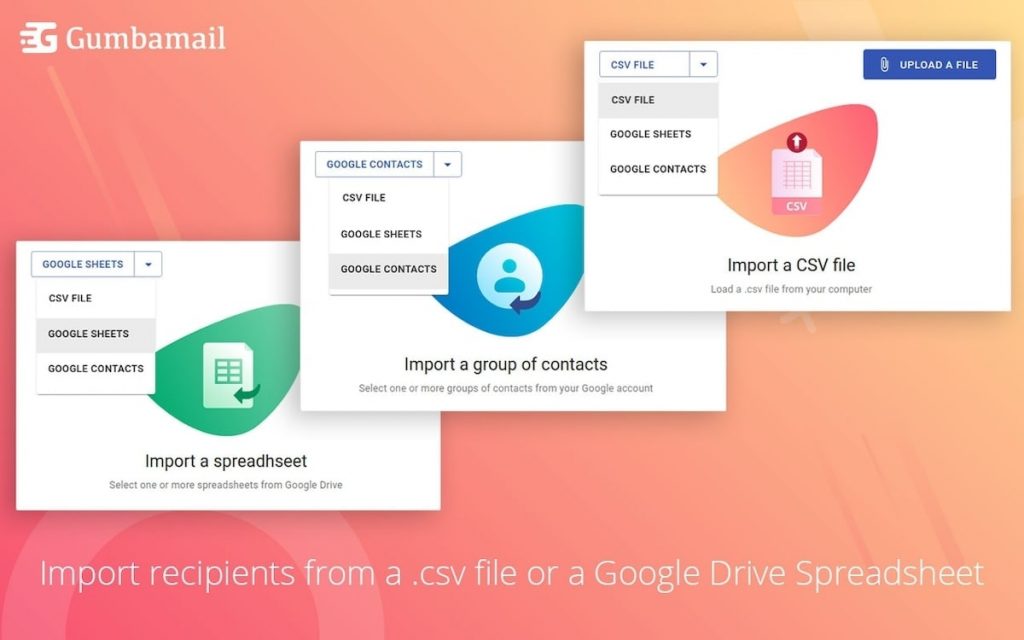
- Click your list, then add members to your list. You can add contacts via a .CSV Excel file, a Google Sheet, or your existing Gmail contacts. Click “Import.”
- Check the box next to each recipient’s name to add them to your list. When you’ve made your selection, click “Add Recipients.”
- To email your list, click “Campaigns” within your Gumbamail panel. Click “New Campaign,” then give your campaign a name and a subject line. Click “Next.”
- On the “Recipients” screen, your list will automatically appear. Check the box next to the list you want to use, then click “Next.” Follow the prompts, select your template, and format your email, then press send.
Gumbamail Makes It Easier Than Ever to Run Your Email Campaign
Distribution lists make it easy to email clients, vendors, or departments without having to spend time typing individual email addresses. Popular email providers — like GoDaddy, Outlook, and Gmail — allow you to create your own distribution lists.
Nowadays, it’s easier than ever to create a distribution list with Gumbamail. Gumbamail is the free email marketing plugin that works in conjunction with your existing Gmail account. With more than 800 email templates, unlimited contacts, advanced reporting metrics, and a drag-and-drop email builder, it’s the most efficient way to mass-message your contacts.
Ready to see how Gumbamail can give you time back in your day? Download the free plugin to get started.