
How to Send Personalized Mass Emails in Gmail on a $0 Budget
Just because you’re sending a mass message doesn’t mean you can’t add a personal touch.
Research shows that adding personalization to an email message can increase the effectiveness of your campaign. Adding personalization can increase your unique open rate by 29% while increasing your unique click rate by 41%, according to Experian. Therefore, if you aren’t putting effort into personalizing your emails, you’re doing yourself — and your business — a disservice.
Fortunately, personalizing your email marketing campaigns is easier than you think. Below, we explain how to send personalized mass emails in Gmail, thereby helping you engage your current and potential customers. Plus, we offer several ideas on how to implement personalization into your marketing strategy.
2 Ways to Start Sending Personalized Mass Email Messages
There’s a number of different ways to personalize your email message, customizing the subject line or body text.
Remember: Before you personalize an email — whether you’re using a recipient’s first name, birth date, order history, or other piece of data — that data must first exist. Therefore, you need to use email automation software with custom fields and merge tags. These features allow you to take two actions:
- Segment your list: You can segment your list based on geographical location, order history, or contact type (vendor, prospect, or customer), then send targeted messages to those specific segments.
- Personalize your text: Merge tags allow you to input contact-specific data directly into your message, whether it’s addressing it to the subscriber’s first name or sending a personal note on their birthday.
6 Ideas to Get Started With Personalization
If you’re a small business owner, sending personalized emails can increase customer engagement (and your bottom line) for very little effort. In fact, research shows that investing in personalization leads to an ROI of 122%.
If you want to start sending personalized emails, here are a few ideas to get started:
- Customize the greeting: Address the salutation to the individual’s first name, so it reads like a letter from a friend, rather than a sales pitch.
- Tailor the subject line: Customize the subject line referring to the customer’s purchase history. For example, a home decor website could say, “Like your new throw? Check out these pillows.”
- Send a birthday message: Compose an automated message to send out on the subscriber’s birthday, giving them a coupon that’s good for 30 days.
- Segment by location: If you own a small chain of brick and mortars, you may want to personalize the email by geographical location. Tailor the body of the text to discuss upcoming promotions at each subscriber’s local store.
- Follow up at set times: You can personalize individual emails to send at specific times. For example, if you are a career coach who offers a free consultation, schedule a follow-up email to send one week after your first call.
- Tweak your language based on activity history: When you launch a campaign, your language will differ depending on whether it’s a cold email or a message sent to a long-standing client. For example, if you’re promoting your summer sale, begin a cold email with an overview of your services, while a warm message should focus on new products only.
How to Send Personalized Mass Emails in Gmail
Sending personalized email campaigns doesn’t require a lot of time or a large marketing budget. In fact, you can send personalized email messages straight from your existing Gmail account. Follow this step-by-step guide to get started:
1. Download the Gumbamail Plugin
Gumbamail is a Google mail merge add-on that allows you to send email marketing campaigns directly from your existing Gmail account. With Gumbamail, you can launch a monthly newsletter, send promo emails, and easily follow up with customers — all without leaving your inbox.
Gumbamail’s pricing tiers offer a free plan, so you can download the app risk-free from the Google Workspace (formerly GSuite) Marketplace. From there, simply follow the permission prompts to allow access to your Gmail account.
2. Build Your Email List
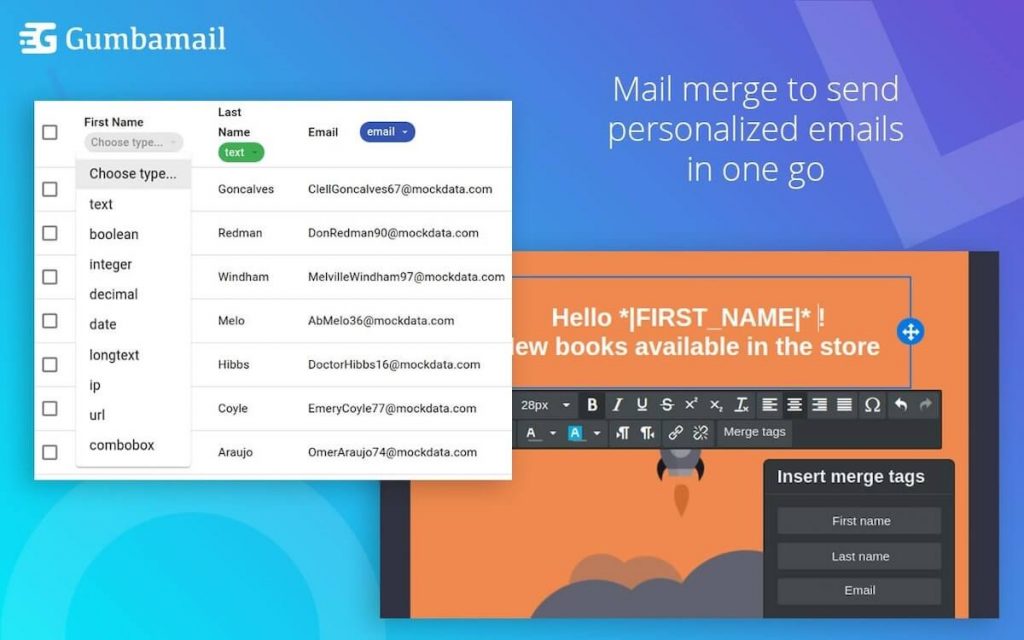
Once the Gumbamail add-on is installed, you need to build your contact list. You can import contacts from a .CSV file in Excel, through Google Sheets, or via your existing Google Contacts. (If you’re exporting contacts from a CRM system, like Salesforce or Hootsuite, simply export via .CSV to later import into Gumbamail.)
Before you import your list, ensure that it contains all necessary data, such as addresses, phone numbers, birth dates, or contact types. The header of each column should contain the field title you wish to populate. After you import your contacts, you can denote the type of data each column contains, such as text, email addresses, or numbers.
3. Draft Your Email Message
Once you import your subscriber list, it’s time to draft your message. Click “campaigns” in the Gumbamail sidebar of your Gmail account, then launch a new campaign.
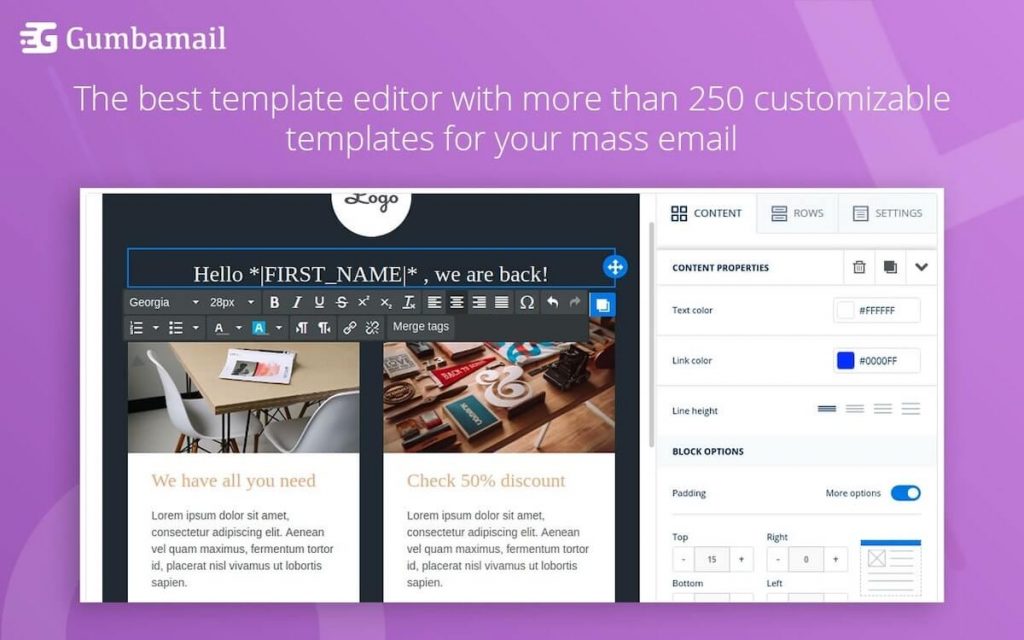
After naming your campaign and writing your subject line, select your email template. Gumbamail offers 800+ templates that are easily customized to your branding, including photos, colors, fonts, and your company logo. After you customize your template, you can begin drafting your message.
4. Insert Merge Tags
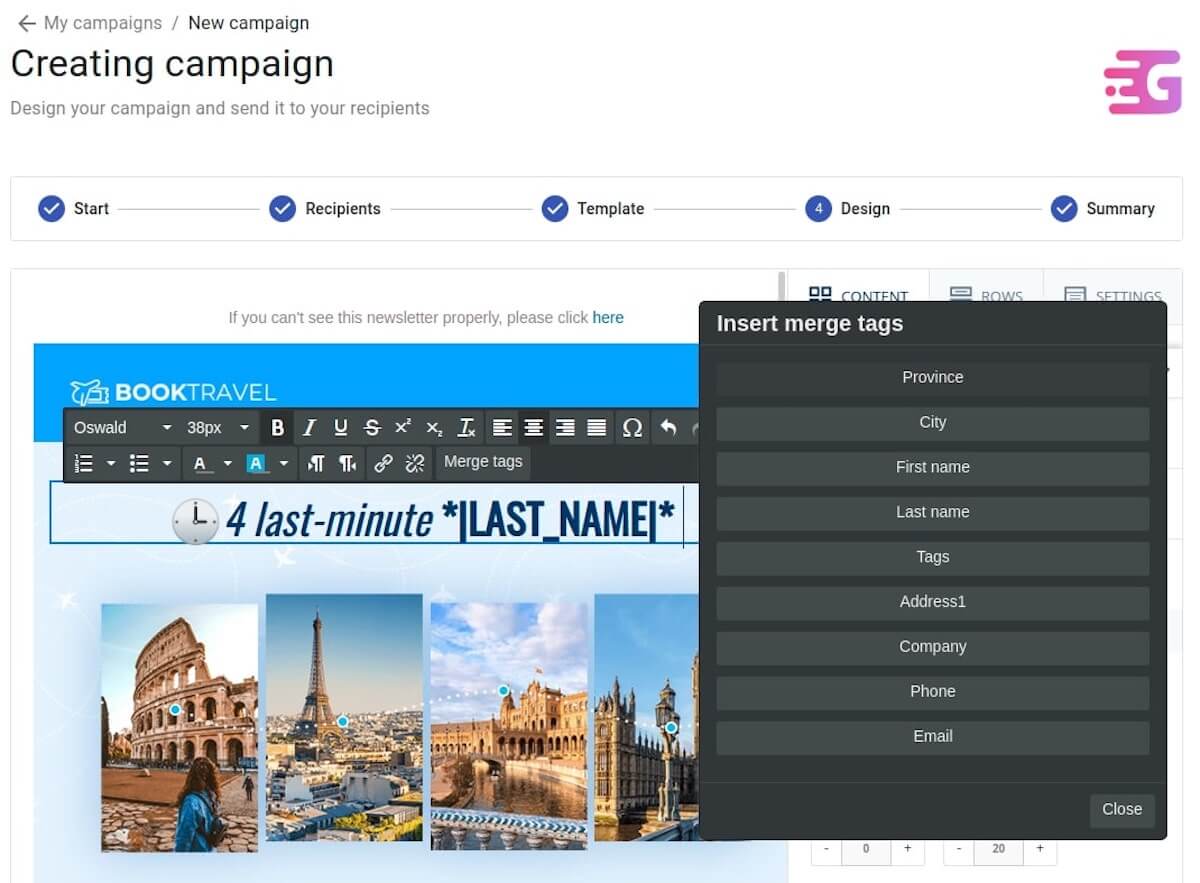
To personalize your email message, you’ll insert merge tags into the body of your message. To use Gumbamail’s personalization capabilities, take the following steps:
- Click on a text block inside your drag-and-drop editor.
- Click the Merge Tags button inside the black editor (view screenshot above).
- Select the tag you want to insert. For example, if you were customizing your greeting, you would select the “First Name” field from the drop-down menu.
- That’s it! Once your email is sent, the text will be customized to the email recipient’s information.
5. Test and Send Your Message
Before sending your bulk email, be sure to do a quick test. Under the Summary tab on Gumbamail’s email builder, click the “Send Test” button. You can send your email directly to your personal or work email address.
The test email allows you to see how the email will appear in your subscribers’ inboxes. Do one last proofread, make any necessary edits, then send or schedule your message for later.
6. Track Your Campaign Performance
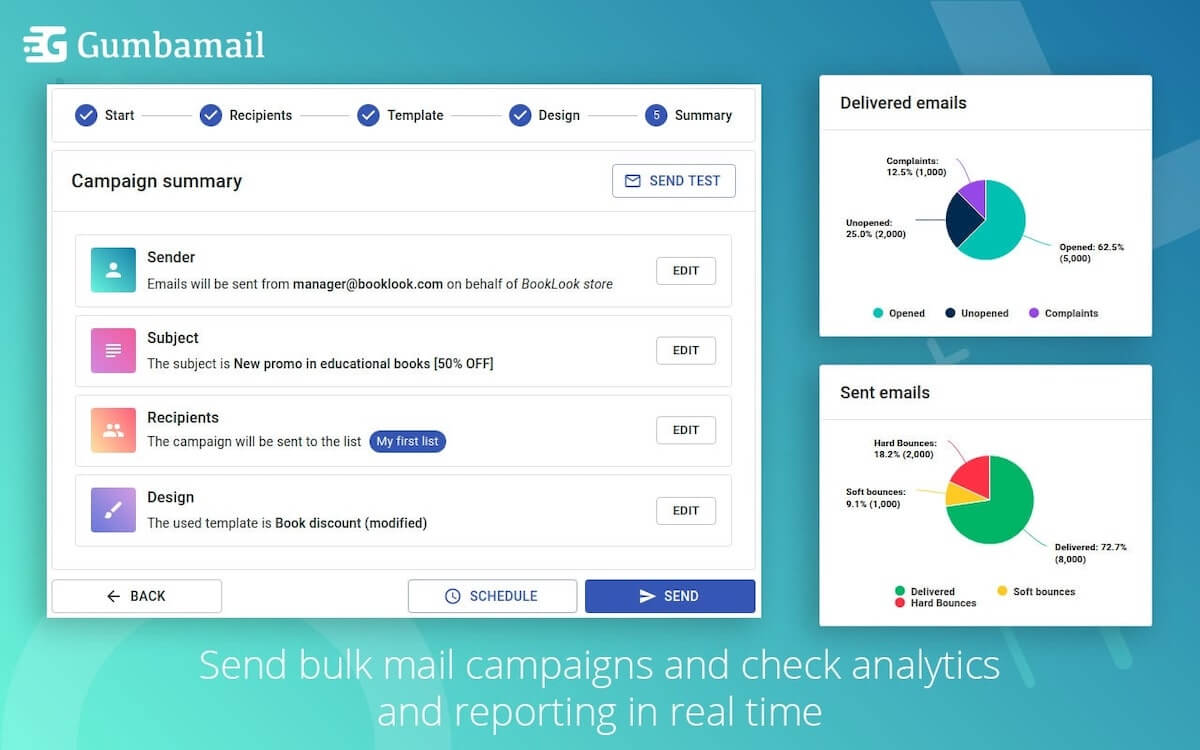
The goal of personalizing your emails is to increase the engagement of your list. Therefore, you need to keep tabs on your list of contacts, paying close attention to changes in open, deliverability, or click rates.
Gumbamail offers advanced reporting metrics for all paid plans, making email tracking incredibly simple for your business. You can easily track emails with or without customization, paying attention to differences in engagement. Plus, it offers a visually appealing reporting dashboard that makes it easy to track engagement.
Use Gumbamail to Send Personalized Mass Emails in Gmail
Sending personalized emails is an easy way to increase engagement on your email list. You can customize your greeting, subject line, or the body text, helping to deepen your connection with your audience.
Gumbamail is an email service that makes it easy to send personalized mass emails from your existing Gmail account. With Gumbamail, you can import your list with custom fields. When you’re ready to start sending mass emails, you can use merge tags to customize the text.
Ready to see how personalized mass mailing campaigns can help transform your outreach strategy? Download the Gumbamail extension to get started.